# React 状态管理的几种方式
题目:实现一个计数器,可以加一,减一,置零。
Demo 地址:
# React state
import React from "react";

export default class Counter extends React.Component {
  constructor(props) {
    super(props);
    this.state = {
      value: 0
    };
  }

  handleClick(actions) {
    switch (actions) {
      case "INCREASE":
        return this.setState((state, props) => ({
          value: ++state.value
        }));
      case "DECREASE":
        return this.setState((state, props) => ({
          value: --state.value
        }));
      default:
        return this.setState({
          value: 0
        });
    }
  }

  render() {
    return (
      <div>
        <p>{this.state.value}</p>
        <button onClick={() => this.handleClick("INCREASE")}>+1</button>
        <button onClick={() => this.handleClick("DECREASE")}>-1</button>
        <button onClick={() => this.handleClick("RESET")}>0</button>
      </div>
    );
  }
}
# Redux
第一步:创建 reducer
- 可以使用单独的一个 reducer,也可以将多个 reducer 合并为一个 reducer,即:combineReducers()
- action 发出命令后将 state 放入 reucer 加工函数中,返回新的 state,对 state 进行加工处理
const reducer = (state = { counter: 0 }, action) => {
  switch (action.type) {
    case "INCREASE":
      return { counter: state.counter + 1 };
    case "DECREASE":
      return { counter: state.counter - 1 };
    default:
      return state;
  }
};
第二步:创建 action
- 用户是接触不到 state 的,只能有 view 触发,所以,这个 action 可以理解为指令,需要发出多少动作就有多少指令
- action 是一个对象,必须有一个叫 type 的参数,定义 action 类型
const actions = {
  increase: () => ({ type: "INCREASE" }),
  decrease: () => ({ type: "DECREASE" })
};
第三步:创建的 store,使用 createStore 方法
- store 可以理解为有多个加工机器的总工厂
- 提供 subscribe,dispatch,getState 这些方法。
const store = createStore(reducer);

store.subscribe(() => console.log(store.getState()));

store.dispatch(actions.increase()); // {counter: 1}
store.dispatch(actions.increase()); // {counter: 2}
store.dispatch(actions.increase()); // {counter: 3}
store.dispatch(actions.decrease()); // {counter: 2}
具体代码如下:
import React from "react";
import { createStore } from "redux";

const reducer = (state = { counter: 0 }, action = {}) => {
  const { type } = action;
  const { counter } = state;
  switch (type) {
    case "INCREASE":
      return { counter: counter + 1 };
    case "DECREASE":
      return { counter: counter - 1 };
    default:
      return { counter: 0 };
  }
};

const store = createStore(reducer);

export default class CounterRedux extends React.Component {
  constructor(props) {
    super(props);
    this.state = {
      counter: 0
    };
    this.unsubscribe = null;
  }
  componentDidMount() {
    this.unsubscribe = store.subscribe(() => {
      this.setState({
        counter: store.getState().counter
      });
    });
  }
  componentWillUnmount() {
    // 取消订阅
    this.unsubscribe();
  }
  render() {
    return (
      <div>
        <h1>{this.state.counter}</h1>
        <button onClick={() => store.dispatch({ type: "INCREASE" })}>+1</button>
        <button onClick={() => store.dispatch({ type: "DECREASE" })}>-1</button>
        <button onClick={() => store.dispatch({ type: "RESET" })}>0</button>
      </div>
    );
  }
}
action 可以单独出来:
const actions = {
  increase: () => ({ type: "INCREASE" }),
  decrease: () => ({ type: "DECREASE" }),
  reset: () => ({ type: "RESET" })
};
// 触发
<button onClick={() => store.dispatch(actions.increase())}>+1</button>;
主要是为了展示 redux 的一个工作流程,并没有把状态挂载在最顶层,详细完整版可以参考阮一峰老师的代码:Redux Counter Example。
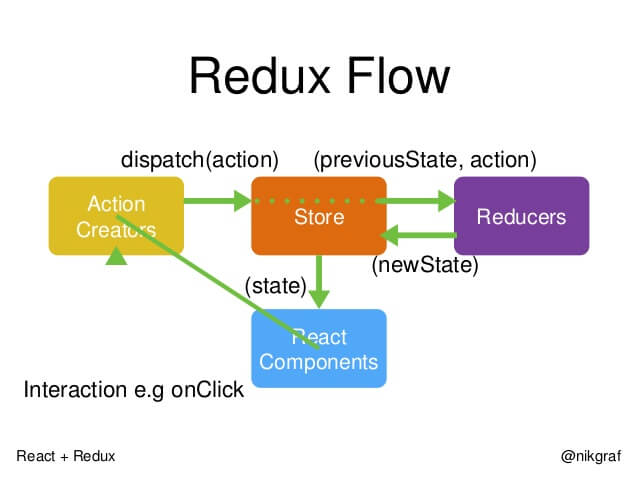
Redux 的工作流程图,阮一峰博客文章摘录:
# React-Redux
Redux 是一款状态管理库,并且提供了 react-redux 库来与 React 亲密配合。
继续实现计数器,完整 Demo 可以看这里。
src 目录下大体结构:
├── actions
│   └── counter.jsx
├── components
│   └── app.jsx
├── reducers
│   └── counter.jsx
└── store
    └── app.jsx
├── index.jsx
首先,看入口文件 index.js:
import React from "react";
import ReactDOM from "react-dom";
import { Provider } from "react-redux";
import { createStore } from "redux";

import reducer from "./reducers/counter.jsx";
import App from "./store/app.jsx";

const store = createStore(reducer);

ReactDOM.render(
  <Provider store={store}>
    <App />
  </Provider>,
  document.getElementById("root")
);
Provider 组件,其实就是 Context 实现的,提供一个状态供跨组件使用,只需要把 store 给他传过去,所有的子组件就可以通过 props 属性拿到状态值。
let Context = React.createContext();
class Provider extends Component {
  // 将React-redux中的Provide包装了react提供的API生成的Context.Provider
  //<Provider store={xxxx}></Provider>,将store挂载在contex上
  render() {
    return (
      <Context.Provider value={{ store: this.props.store }}>
        {this.props.children} //子组件
      </Context.Provider>
    );
  }
}
Reducer 函数,它接受 Action 和当前 State 作为参数,返回一个新的 State,内容和之前的几乎差不多:
import reducer from "./reducers/counter.jsx";
// ./reducers/counter.jsx
export default function reducer(state = { counter: 0 }, action = {}) {
  const { counter } = state;
  const { type } = action;

  switch (type) {
    case "INCREASE":
      return { counter: counter + 1 };
    case "DECREASE":
      return { counter: counter - 1 };
    default:
      return { counter: 0 };
  }
}
React-Redux 的核心之一 connect 方法,用于从 UI 组件生成容器组件。connect 方法接受两个参数:mapStateToProps 和 mapDispatchToProps。它们定义了 UI 组件的业务逻辑。前者负责输入逻辑,即将 state 映射到 UI 组件的参数(props),后者负责输出逻辑,即将用户对 UI 组件的操作映射成 Action。
import App from "./store/app.jsx";
// ./store/app.jsx
import { connect } from "react-redux";

import App from "./../components/app.jsx";
import {
  increaseAction,
  decreaseAction,
  resetAction
} from "./../actions/counter.jsx";

// mapStateToProps用户自己定义需要的状态
const mapStateToProps = state => ({ counter: state.counter });

const mapDispatchToProps = dispatch => ({
  onIncreaseHandle: () => dispatch(increaseAction),
  onDecreaseHandle: () => dispatch(decreaseAction),
  onResetHandle: () => dispatch(resetAction)
});

export default connect(
  mapStateToProps,
  mapDispatchToProps
)(App);
Action 的 type 属性:
// ./../actions/counter.jsx
export const increaseAction = { type: "INCREASE" };
export const decreaseAction = { type: "DECREASE" };
export const resetAction = { type: "RESET" };
接着,我们看一下熟悉的 App 组件应该怎么写:
// import App from "./../components/app.jsx";
import React from "react";

class App extends React.Component {
  render() {
    let {
      counter,
      onIncreaseHandle,
      onDecreaseHandle,
      onResetHandle
    } = this.props;
    return (
      <div>
        <h1>{counter}</h1>
        <button onClick={onIncreaseHandle}>+1</button>
        <button onClick={onDecreaseHandle}>-1</button>
        <button onClick={onResetHandle}>0</button>
      </div>
    );
  }
}

export default App;
前期做了许多工作,这里如同从父组件里获取 props 属性般获取、触发等行为,所有 store 里的 state 都通过 connect 方法给处理了:
connect(
  mapStateToProps,
  mapDispatchToProps
)(App);
到这里,计数器基本的功能都好了,我的 Demo,阮一峰老师的 Demo,以及讲解的文章,Redux 入门教程(三):React-Redux 的用法,让 react 用起来更得心应手——(react-redux)。
# React Hooks
Hook 是 React 16.8 的新增特性。它可以让你在不编写 class 的情况下使用 state 以及其他的 React 特性。
动机:
- 在组件之间复用状态逻辑很难
- 复杂组件变得难以理解
- 难以理解的 class
React Hooks 的设计目的,就是加强版函数组件,完全不使用"类",就能写出一个全功能的组件。
React Hooks 的意思是,组件尽量写成纯函数,如果需要外部功能和副作用,就用钩子把外部代码"钩"进来。 React Hooks 就是那些钩子。
import React, { useState } from "react";

function Counter() {
  const [count, setCount] = useState(0);
  return (
    <div>
      <h1>{count}</h1>
      <button onClick={() => setCount(count + 1)}>+1</button>
      <button onClick={() => setCount(count - 1)}>-1</button>
      <button onClick={() => setCount(0)}>0</button>
    </div>
  );
}

export default Counter;
对比 Class Component 中将组件状态放在 state 属性中维持的做法,React Hook 使用 useState 方法来在 Function Component 中创建状态变量、创建改变状态的方法、传入初始状态。这样就实现了一个拥有自己的状态的 Function Component。
显而易见,无论是简洁程度还是优雅程度,Function Component 都要远远优于 Class Component。